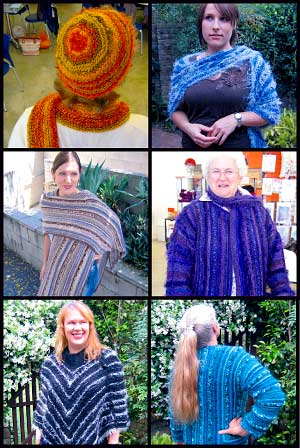

Make your own beautiful, creative and individual versions of seven different garments using odd balls of yarn and simple knitting stitches.
Click on the pattern name below to see more detail:
- All the patterns
- The Scarf
- The Beanie
- The Triangle Scarf
- The V-Wrap
- The Jacket
- The Poncho
- The Variable Jumper/Top
The Odd Ball Knit Book
- None of the garments made from the patterns in this book will look like any other.
- No set yarn. Use different, thicknesses, textures and types, all combined. Use up your stash!
- No set sizes. Can be used for babies, children and adults.
- Many other useful knitting tips and techniques. See list of what is included.
- A new way of casting off which looks just the same as the regular way, but is quicker and easier!
- The 3 needle cast off for joining two pieces without casting off and sewing.
- 3 ways of casting on, including an invisible cast on technique.
- Weaving in ends of yarn as you knit, rather than sewing them in later.
- Picking up stitches from an edge.
- Mitred knitting using markers.
- Basic patterning — how to work out how many stitches to use for your size, with your yarn.
If you already have a copy of the book, read on for a new improved way to do the jacket's sleeves!
Improved cast-on method for jacket sleeves.
The Jacket
Find these instruction numbers in your jacket pattern and replace the text with this below. Requires crochet hook similar size to needles and small amount "scrap" yarn.
10. Cast on replacement sts
Using some spare "scrap" yarn and a crochet hook, crochet the same number of sts around your left knitting needle, to replace those placed on stitch holder. Do this as follows: make a loop in the scrap yarn and place on hook. Holding left needle vertically, wrap yarn around needle and pull through loop on hook, repeat for the number of sts required. This gives an "invisible cast-on" that can be removed and discarded later.
Knit these cast on sts and continue knitting — decreasing before the markers as usual — to the safety pin you placed earlier at the other end of the row. Place the sts (after the pin) on another stitch holder. Cast on the same number of sts with the invisible cast-on method again. Knit these sts to complete the row. Knit the wrong side row back across all the replacement sts, still decreasing as usual.
14. The sleeves:
For a vest: follow the next instructions, but just work 2 or 4 rows for an edge and then cast off. Join shoulders as for jacket — go to step 15.
For the jacket: With right side facing, knit the sts from holder for right sleeve, place a marker on the right needle (this will be the middle of the row), and then use the other needle to pick up the underside of the first row of sts above the crochet chain that is the invisible cast-on— you can undo the chain of scrap yarn and "unzip" it stitch by stitch. Knit all the sts from this needle to complete the row. You will now have a row of sts with a marker in the centre; this is the sleeve; the marker is at the underarm and the ends of the rows lie along the top of the sleeve. The sleeve will be worked downwards to the cuff.
Work sleeve, decreasing as you go, and remembering to decrease on both sides of the marker, and in the centre of the row, not the ends, and only on the decrease rows. A memory jogger such as a different type or colour of marker, will help you to remember this is the sleeve, not the body; by the time you have knitted all of the body piece, you may find yourself on autopilot, decreasing before the marker only! Note: it’s a good idea to work both sleeves at the same time, on two sets of needles, to match stripes and ensure yarn doesn’t run out on one sleeve, before the other is finished. Work left sleeve the same, but picking up sts from the cast on edge first, then adding sts from holder. (Check that sleeves are the correct length before casting off — pin shoulders together and "try on" your jacket). Cast off knitwise on the right side at the cuff, using a larger needle to keep it loose.
Also a small error in the book (my apologies), on page 16:
Head measurements for 6-12 month size should read 45-50 cms, (rather than 45-47 cms).